The Web App is what you will need to start your session. The electricity only turns on once you’ve logged in. Once you have done that, you can control the Microphone / Line levels on the app.
We have a custom web application that gives you access to our Digital Mixer. Depending on which room you’re in, the mixer would either be a Behringer XR-18 or X32. Regardless, you will be able to control:
What you wish to hear in the Front of House (FOH) speakers
Levels for personal In-Ear Monitors / Floor Monitors
Volume levels, Gain Levels, EQ, Compression, Noise Gate, Effects, of each channel
Levels that will be sent for recording or live streaming
Safe presets so you can load back any time you come back
Split stereo audio (Bluetooth) into separate mono channels
The web application also lets you to control our custom system that allows you to:
Record audio/ video
Playback recorded track
Do live streaming
Open and control the Web Browser
Connect your Bluetooth Audio Device for playback
Open up the Tuner on the screen to tune any audio input connected to the mixer
The link to the web application can be found in the studio room. Access the link on your web browser and you can access all the features listed below.
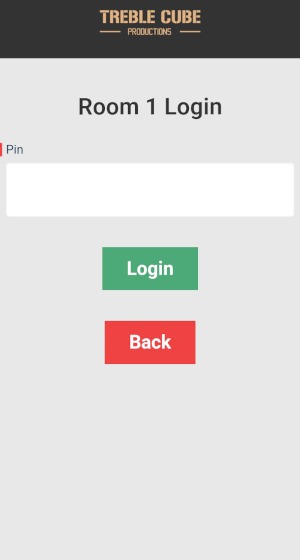
Getting there:The link to the web application can be found in the studio room. Look for the QR code pasted around the room. Access the link on your phone / tablet or laptop to login to start the electricity in the room and access all its features.
STEP 1
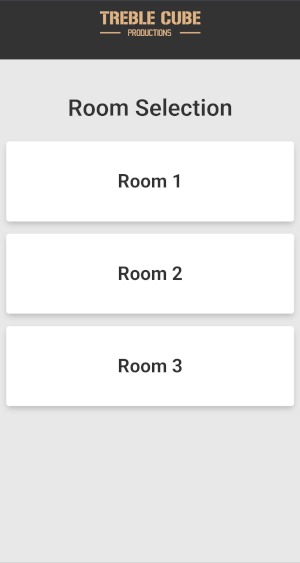
Select Room number and proceed to login page
STEP 2
Enter the access code which you received via E-Mail. This is the same access code used to access the studio
STEP 3
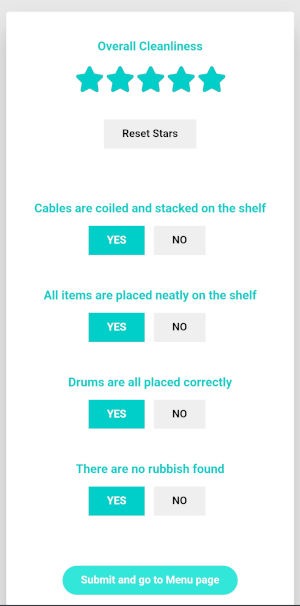
You will be brought to the Survery page. This is where you can help us monitor if the previous band has kept all items in the correct place and kept the place clean
It all is good, you can click the “Submit” button at the bottom as all fields has already been set by default. Once submitted, you will be brought to the Menu page
STEP 4
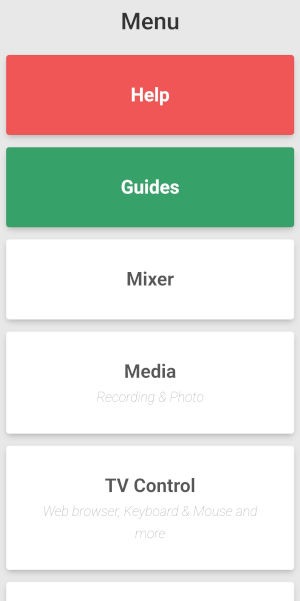
You will be brought to the Menu page. This is where you can access all of the features the room has to offer
You can go back to the menu at any time by clicking the ‘Menu‘ button on the top right hand corner
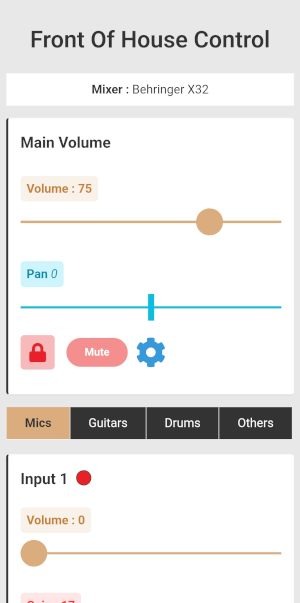
SPEAKER (FOH) VOLUMES FOR MICROHPONES, KEYBOARDS, ETC
Getting there:On the Main Menu, Select 'Mixer' and then, select 'Front of House'
This is where you can control the levels for any inputs to the Main Speakers in the room. This could be for Microphones, Keyboards, Bluetooth / PC Audio and other line inputs.
STEP 1
You will be able to see all the possible inputs to the mixer. The Main Volume is set by default so you do not need no adjust that
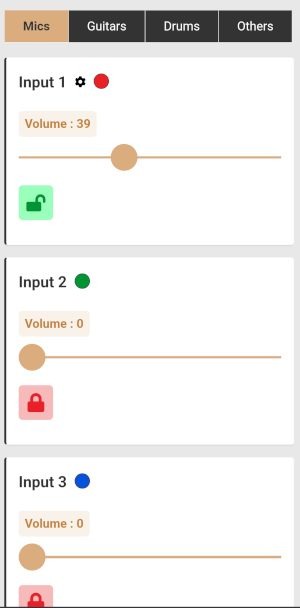
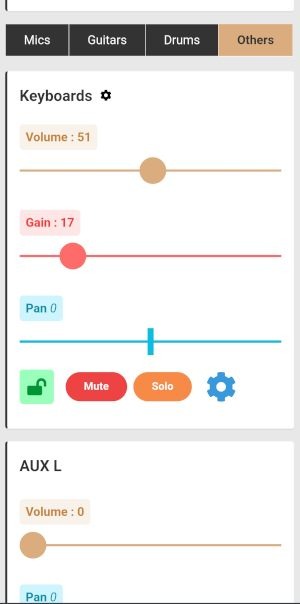
Below that, you will be a few buttons like Mics, Guitars, Others, Etc and these are category tabs you can click to view the respective channels. Below these buttons are the channels for your to adjust.
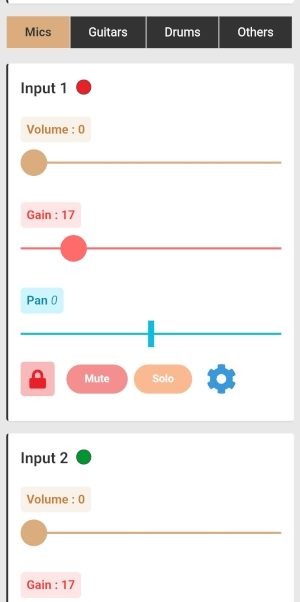
STEP 2
For Microphones / Line Inputs, you will see colour(s) beside the input name. The same colour(s) are cable tied on the Microphone (XLR) cables to identify each cable you’re going to control
Keyboards and PC/Bluetooth Audio can be found under the Others Tab
STEP 3
Click the Unlock button on the bottom left of the channel you wish to control and then you can proceed to adjust the levels
Microphones:
For connecting Vocal Microphones directly, setting the Gain to 30 and Volume to 70-90 are decent levels to start with
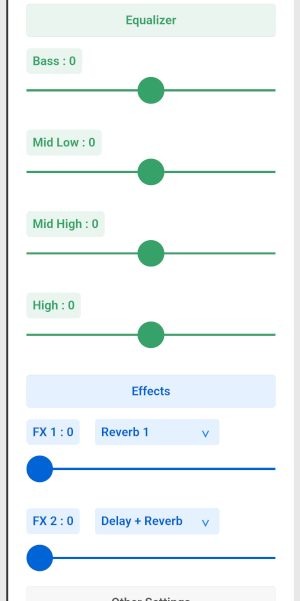
STEP 4 (Advanced Options)
Click the Blue Gear Icon on the bottom right of each channel to access Equalizer(EQ), Effects, Compression, Noise Gate and Phantom Power settings.
For Effects, select the drop down menu to select a list of available effects like Reverb, Chorus, Delay, etc.
Do note that adjusting these advanced setting will affect the recording or live streaming. Only the fader level and pan will not be affected.
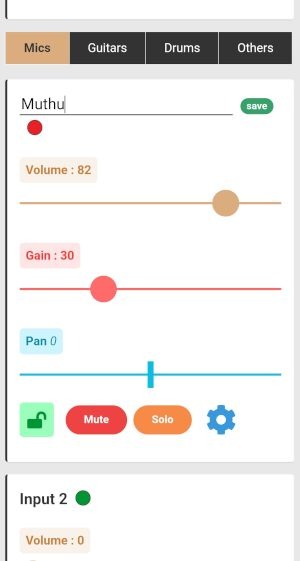
STEP 5 (Naming)
You can have the option to name each channel so that other members using the app, including yourself, can easily identify who’s who.
Select the black gear icon beside the channel name to edit and then click save.
Made sure you have unlocked the channel in order to edit the name.
PERSONAL MONITORING
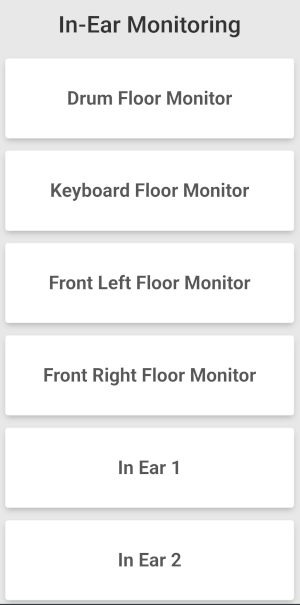
Getting there:On the Main Menu, Select 'Mixer' and then, select 'Floor/In Ear Monitoring'
In this page, select which monitor you which you control. Select the respective monitors you wish to control. This is independent and will not affect the other monitors or Front of House (FOH) speakers.
STEP 1
Select the personal monitor output you wish to control.
There are Floor Monitoring and In-Ear Monitoring options in the room. Select which you wish to control
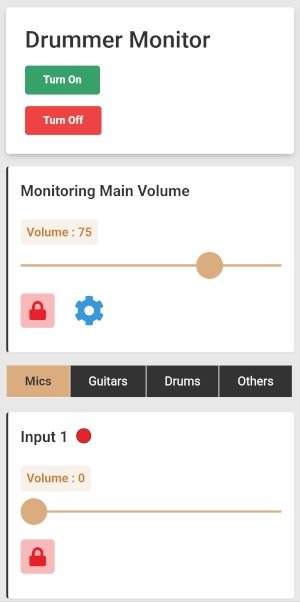
STEP 2 (Turn it on)
For certain monitors, it requires you to turn it on. Click the “Turn On” button to turn it on before proceeding.
If the page you’re in doesn’t have this, that means it is already turned on by default and you can ignore this step
STEP 3
Just like how you controlled in the FOH section, adjust each level to your respective monitor.
Notes that only the Volume Level can be controlled. Any other settings can only be adjusted in the FOH Control page.
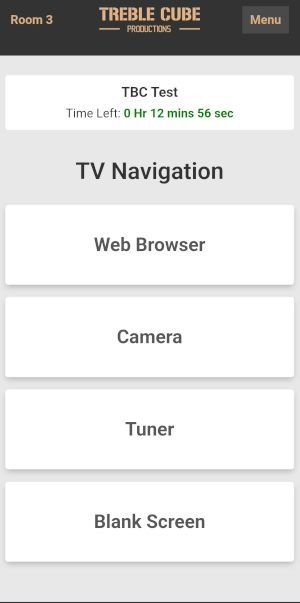
WEB BROWSER
Getting there:On the Main Menu, Select 'TV Control' and then, select 'Navigation'. Proceed to click "Web Browser"
Here, you can open up YouTube and play music on the speakers or look for lyrics and tabs
STEP 1
Click “Web Browser” in the TV Navigation page.
STEP 2
Once you have clicked “Web Browser”, you will be brought to the mouse & keyboard page where you can navigate around the browser.
Use the Touchpad to move the mouse around and tap to click. Use the Scroll section to scroll up and down or use the buttons below
STEP 3 (Keyboards)
To type things in an input field in the browser, Make sure you have clicked the input field.
Type in characters in the Keyboard field in the bottom and press the enter key for it to be displayed on the browser.
If you face issues or wish to chance URLs, click the “Restart Web Browser” button
STEP 4 (Volume)
In the FOH section to control volumes to the main speakers, go to the “Others” tab and control the “PC/Bluetooth” or “AUX L” channel (whichever is available on the page)
See the guide here to know how to control volumes on the speakers
PC / BLUETOOTH AUDIO SELECTOR
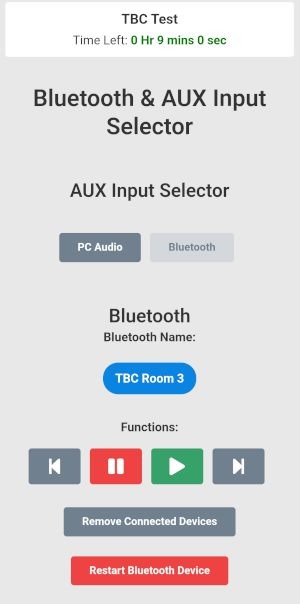
Getting there:On the Main Menu, Select 'Tools' and then, select 'Bluetooth & AUX Input Selector'
You can either choose to play audio from the PC or Bluetooth. This page is where you select your choice.
Using Bluetooth, you can connect your phone, tablet or laptop to play your audio tracks.
STEP 1
Under AUX Input Selector select Bluetooth or PC Audio to select the source of the audio.
By default, PC Audio is selected
STEP 2 (Bluetooth)
If you are using Bluetooth, connect to the Bluetooth name shown on the screen.
You can control the Bluetooth device from here.
STEP 3 (Volume)
In the FOH section to control volumes to the main speakers, go to the “Others” tab and control the “PC/Bluetooth” or “AUX L” channel (whichever is available on the page)
See the guide here to know how to control volumes on the speakers
TUNER
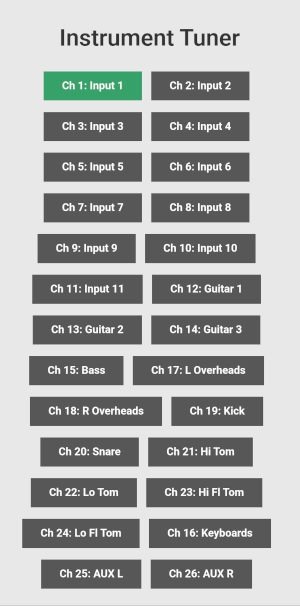
Getting there:On the Main Menu, Select 'Tools' and then, select 'Tuner'
You can tune any instrument that’s connected to the mixer
STEP 1
Once you’ve opened the tuner page, you will see a list of channels. Select which channel you wish to tune
On the TV screen, you will see the tuner and the frequency / note the audio is on and you can tune accordingly
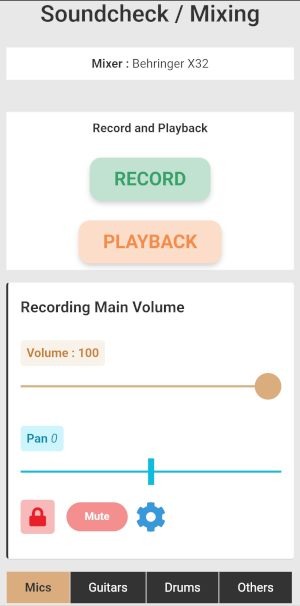
SOUND CHECK / MIXING FOR RECORDING OR LIVE STREAMING
Getting there:On the Main Menu, Select 'Media' and then, select 'Audio Mixing'
This feature allows you to play your music as a band while the system records it. You can then play it back through the speakers and adjust individual channel on the mixer so that you can get a better mix for the MP3 file or Live Streaming.
Please ensure that the physical volume in the studio has been set like the guitar & bass amps and vocal microphone levels because adjusting amp volume or microphone volume during recording or live streaming will affect the audio signal.
STEP 1
Make sure you have already set all settings for jamming such that every instrument can be heard properly (unless you’re using in-ears to hear yourselves)
Click “Record” and jam for a few seconds or just a few bars. Once you’re done, click “Stop”.
Notice the bottom left of the TV screen and make sure the “Processing Audio” has disappeared.
STEP 2
Press the ‘PLAYBACK‘ button and the audio should be playing back on the speakers
Stop playing any instrument while the audio is looping so you can properly hear the audio. Proceed with the mixing.
STEP 3
Proceed to adjust the Volume and Pan to for a better mix.
NOTE:Adjusting other levels would affect every other signal to the FOH and monitors so it’s best to limit to adjusting the Volume and Pan only.
Once done, click “Stop Playback” and you’re all set to recording in the recording page
AUDIO/ VIDEO RECORDING
Getting there:On the Main Menu, Select 'Media' and then, select 'Recording'
All media will be sent to your email within seconds (depending on the file size). Please limit each song to a few minutes. You can record as many songs as you like. Do make sure you’ve done Soundcheck/Mixing
Video Recording isn’t stable at the moment. Limiting to just audio recording would be better at the moment
STEP 1
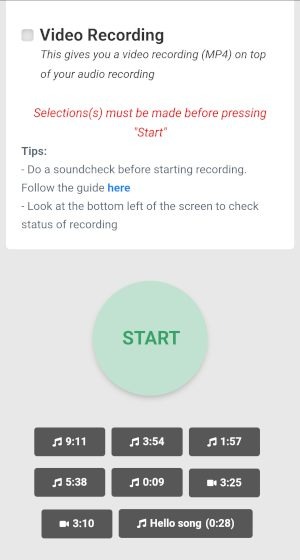
By default, you will only get a Mixed MP3 audio file. You can include a song title for each song you record and that will be the file name of the media files that will be sent to you
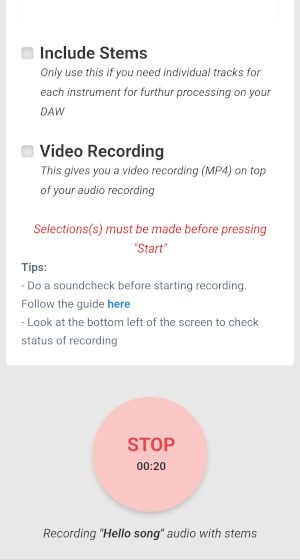
Selecting “Include Stems” will give you individual WAV files for each channel.
Selecting “Video Recording” will give you an MP4 file on top of the stems and MP3.
Once you’re ready, click “START”
STEP 2
The countdown buffer will be displayed on the TV screen. After the countdown, the actual recording starts.
On the bottom left of the TV screen, you will be able to see the status. Look out for this.
After 5 seconds, you should be able to see the time lapse of the audio and some information of your recording based on your selection.
Press “STOP” after the song has ended.
STEP 3
Make sure the “Processing Media” on the bottom left of the TV Screen has disappeared before proceeding.
You will see a list of files that you have previously recorded below the start button. The file will appear after refreshing the page.
You can click on the file and it will play back the recorded MP3 file on the speakers
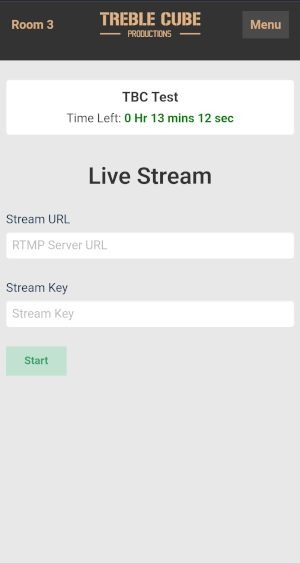
LIVE STREAMING
Getting there:On the Main Menu, Select 'Media' and then, select 'Live Stream'
Live Streaming isn’t stable at the moment. Issues might occur during this process
STEP 1
You need to have the Stream URL and Stream Key ready for this.
Copy them in the input boxes and click start and the Video and Audio should be streaming to the stream service